
Access Guide
Introduction
- Services / facilities within the building include meeting rooms, research labs and offices.
- There is a bridge that links this building to the Lewis Carroll Building (Block AC) on the second and third floors. There is also an internal link to the Alan Turing Building (Block BB). For more information on these buildings, please see the Lewis Carroll Building (Block AC) and the Alan Turing Building (Block BB) access guides.
- Related link Alan Turing Building (Block BB).
- Https://www.accessable.co.uk/university-of-surrey/access-guides/alan-turing-building-block-bb#eb266fb4-317c-dd47-847f-bcfbcf55efc3
- Related link Lewis Carrol Building (Block AC).
- Https://www.accessable.co.uk/university-of-surrey/access-guides/lewis-carroll-building-block-ac
- Related link For information regarding Mobile Connect and Assisted Listening.
- Http://www.surrey.ac.uk/mobileconnect
Getting Here
-
By Road
View
- Guildford is 30 miles South West of London and can be accessed from the A3. If approaching from London or the M25 (Junction 10), the University exit is signed from the A3 bypass.
If accessing from the A322 or A323 from Bagshot or Aldershot, at the A3 roundabout take the exit signed to Portsmouth, and then turn off the A3 at the first exit (signed to the Cathedral and University).
If entering Guildford from Horsham (A281) or Godalming (A3100), leave the central gyratory system at the exit signed for Farnham (A31).
After approximately 200 yards, at the mini-roundabout, take the first turning right into Guildford Park Road, and continue along Madrid Road and The Chase for a mile. At the next roundabout, take the third exit for the University entrance. - Parking is very limited on site. There is a pay and display car park, other car parks operate a permit system.
Vehicles displaying a Blue Badge may park free in the car parks and in Blue Badge bays for up to 6 hours, unless the University host or driver has made arrangements with the Security Office for a longer stay.
- Guildford is 30 miles South West of London and can be accessed from the A3. If approaching from London or the M25 (Junction 10), the University exit is signed from the A3 bypass.
-
By Bus
View
- On site bus stops are available and ARRIVA buses operate a regular service to the campus from the train station. Services 3, 17, 27 and 37 run approximately every ten minutes during the day.
-
By Train
View
- Guildford Station is approximately 1.2 miles from the University. It is on the main line between London Waterloo and Portsmouth. Half-hourly train services run from Guildford to Waterloo, with a journey time of around half-an-hours.
To get to the University from the station, exit by footbridge and the rear (western) exit. Turn right from the station along Guildford Park Road and take the second turning on the right (just past the Evangelical Church). Follow the path through the council car park to the campus.
- Guildford Station is approximately 1.2 miles from the University. It is on the main line between London Waterloo and Portsmouth. Half-hourly train services run from Guildford to Waterloo, with a journey time of around half-an-hours.
-
Useful Links
View
- Please see the University website's 'How To Get Here' page for more details on travelling to the campus.
- To view the web page described above click here (opens in new tab).
- Please see the Surrey County Council website for details of buses in Guildford.
- To view the web page described above click here (opens in new tab).
- Please see the National Rail website, for details of trains to Guildford.
- To view the web page described above click here (opens in new tab).
Useful Information
- To see more information on Student Services please click here (opens new tab).
- Telephone Number: 01483 686 868.
- Email: [email protected].
- To see more information on Accommodation Services please click here (opens new tab).
- Telephone Number: 01438 682 466.
- Email: [email protected].
- To see more information on Admissions Enquiries please click here (opens new tab).
- Telephone Number: 01483 682 222.
- Email: [email protected].
- To see more information on Students' Union please click here (opens new tab).
- Telephone Number: 01483 689 223.
- Email: [email protected].
- Staff undertake essential e-learning courses on diversity, which includes a module of disability.
Site/Campus Car Park (Pay and Display Car Park)
-
Car Park
View
- The car park is located on the north side of the campus, off Perimeter Road.
- The nearest building(s) to this car park is/are the Austin Pearce and Rik Medlik Buildings.
- The car park type is open air/surface.
- The car park does not have a height restriction barrier.
- The car park surface is tarmac.
- Designated Blue Badge parking bays are not available.
-
Charges and Restrictions
View
- This car park can be used by anybody.
- Parking charges apply for all users.
- Signs are provided to give information on parking charges/restrictions.
- Signs are clearly presented.
- Payment machines are located at the front of the car park.
- There is a payment machine at a convenient height for wheelchair users.
- There is not a level turning space (minimum 185cm x 210cm) in front of the payment machine(s).
- Payment can be made by phone.
- To see more information on parking policies please click here (opens new tab).
-
Drop Off Point
View
- There is not a designated drop off point in this car park.
-
Car Park Access
View
- There is sloped access to the car park from the Austin Pearce Building.
- This car park is clearly signposted from the Perimeter Road.
Site/Campus Car Park (Permit Holders Car Park)
-
Car Park
View
- The car park is located on the north side of the campus, off Perimeter Road.
- The nearest building(s) to this car park is/are the Austin Pearce and Rik Medlik Buildings.
- The car park type is open air/surface.
- The car park does not have a height restriction barrier.
- The car park surface is tarmac.
- Designated Blue Badge parking bays are not available.
-
Charges and Restrictions
View
- This car park can be used by visitors, permit holders, staff permit holders and student permit holders.
- There are no parking charges that apply on the day.
- Signs are provided to give information on parking charges/restrictions.
- Signs are clearly presented.
- To see more information on parking policies please click here (opens new tab).
-
Drop Off Point
View
- There is not a designated drop off point in this car park.
-
Car Park Access
View
- There is ramped/sloped or stepped access to the car park from the Austin Pearce Building and the rest of the campus.
- This car park is clearly signposted from the Perimeter Road.
Building Parking
- The building does not have its own dedicated parking.
-
Site/Campus Car Parks
View
- There is a site/campus car park for staff and visitors within approximately 200m.
- The name of the car park is Pay and Display and Permit Holder Car Park.
- The car park is located at the top of the campus.
-
Public Car Parks
View
- There is not a car park for public use within 200m (approx).
-
On Street Parking
View
- Clearly signed and / or standard marked parking bays are not available.
-
Drop Off Point
View
- There is not a designated drop off point.
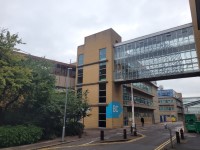
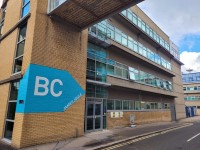
Outside Access (Entrance to Block BB and BC Shared Stairs)
-
Entrance
View
- This information is for the entrance located at the front of the building, opposite Austin Pearce Building (Block AP).
- There is step free access at this entrance.
- The main door(s) open(s) towards you (pull).
- The door(s) is / are double.
- The door(s) may be difficult to open.
- The width of the door opening is 122cm (4ft).
- There is a small lip on the threshold of the entrance, with a height of less than 2cm.
-
Second Set of Doors
View
- There is a second set of doors.
- The door(s) open(s) towards you (pull).
- The door(s) is / are double.
- The door(s) is/are easy to open.
- The width of the door opening is 134cm (4ft 5in).
-
Comments
View
- There is an identical entrance at the rear of the building which is directly opposite this entrance, shown in photographs 4, 5 and 6.
- This entrance has a shallow step in front of it, and leads out to a steep slope at the rear of the building (photographs 7 and 8).
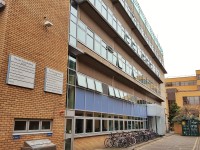
Outside Access (Department of Chemical & Process Engineering)
-
Entrance
View
- This information is for the entrance located at the front of the building.
- There is ramped/sloped access at this entrance.
- A key card is required for access at this entrance.
- The height of the card reader/lock is 112cm (3ft 8in).
- There is a canopy or recess which provides weather protection at this entrance.
- The main door(s) open(s) automatically (towards you).
- The door(s) is / are double.
- The width of the door opening is 160cm (5ft 3in).
- There is a small lip on the threshold of the entrance, with a height of less than 2cm.
-
Ramp/Slope
View
- There is a ramp/slope at this entrance.
- The ramp/slope is located in front of the entrance.
- The ramp/slope gradient is steep.
-
Comments
View
- There is a door release button to exit which is 106cm high.
- There is a dark mat upon entry which may look like a hole to some people.
Lift (Access to the Chemical Engineering Teaching Lab 02bc01)
- There is a lift for public use.
- The lift is located to the right as you enter the Department of Chemical & Process Engineering entrance.
- The lift is a platform lift.
- The floors which are accessible by this lift are G, 1.
- Wall mounted information boards are not provided at lift landings.
- The weight limit for the lift is 410 kg.
- The lift is approximately 5m (5yd 1ft) from the Department of Chemical & Process Engineering entrance.
- Staff do need to be notified for use of the lift.
- There are not separate entry and exit doors in the lift.
- There is not a mirror to aid reversing out of the lift.
- The lift does not have a visual floor indicator.
- The lift does not have an audible announcer.
- The lift does not have a hearing enhancement system.
- The lift does not have Braille markings.
- The lift does have tactile markings.
- The controls for the lift are within 90cm - 120cm from the floor.
- The lighting level in the lift is low to moderate.
-
Comments
View
- At the time of survey (November 2022) the lift was locked.
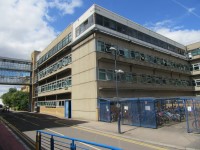
Outside Access (Entrance to Block BC Staircase)
-
Entrance
View
- This information is for the entrance located at the rear of the building, opposite The Lewis Carroll building.
- There is ramped/sloped access at this entrance.
- There is not a canopy or recess which provides weather protection at this entrance.
- The main door(s) open(s) towards you (pull).
- The door(s) is / are double.
- The door(s) may be difficult to open.
- The width of the door opening is 150cm (4ft 11in).
- There is a small lip on the threshold of the entrance, with a height of less than 2cm.
-
Ramp/Slope
View
- There is a ramp/slope at this entrance.
- The ramp/slope is located in front of the entrance.
- The ramp/slope gradient is steep.
-
Comments
View
- There is an identical entrance directly opposite the one surveyed (shown in photograph 5). There is a permanent long, steep slope in front of this entrance (photographs 6 and 7).
Entrance (Bridge Joining Blocks BC and AC)
-
Entrance
View
- This information is for the entrance located on levels 3 and 4.
- There is step free access at this entrance.
- The main door(s) open(s) away from you (push).
- The door(s) is / are double.
- The door(s) is / are light.
- The width of the door opening is 168cm (5ft 6in).
-
Second Set of Doors
View
- There is a second set of doors.
- The main door(s) open(s) towards you (pull).
- The door(s) is / are double.
- The door(s) is / are heavy.
- The width of the door opening is 168cm (5ft 6in).
Getting Around (Corridors/ Areas for CPE Labs, Offices or Other Labs)
-
Access
View
- There is/are 3 clearly marked step(s), with no handrails, for access to the block bc staircase from the entrance to block bc staircase rear entrance.
- The step(s) is/are medium height (11cm - 17cm).
- Photograph 1 shows these steps.
- There is/are 5 clearly marked step(s), with handrails on both sides, for access to 3 labs within the CPE labs area on the ground floor..
- The step(s) is/are medium height (11cm - 17cm).
- There is a platform lift which overcomes the steps.
- Photograph 2 shows these steps and lift. The lift has controls 92cm high.
- There is/are 10+ unmarked step(s), with handrails on both sides, for access to CPE labs on the lower level of the ground floor..
- The step(s) is/are medium height (11cm - 17cm).
- Photograph 3 shows these steps.
- There are doors in corridors which have to be opened manually.
-
Getting Around
View
- There is clear signage for building facilities/areas in the foyer/reception area.
- There is clearly written directional signage at key points of circulation routes.
- There is some flooring in corridors which is shiny and could cause issues with glare or look slippery to some people.
- There is good colour contrast between the walls and floor in the majority of corridors.
- The lighting levels are good.
- This building does not play background music.
- There is not a hearing assistance system.
-
Comments
View
- On the ground floor there are various labs workshops and offices along the corridors.
- There are various manual doors within the area.
- There are some door guards on some of the doors (photographs 4-7).
- Photograph 8 shows one of the corridors on the first floor.
- Photograph 9 shows a seating area on the second floor which comprises of study rooms, offices, a computer room and CPE offices. The desks are 72cm high and the chairs have armrests.
- Photograph 10 shows seating before the entrance to the office area on the second floor from the BC staircase.
- Photograph 11 shows a stair lift within a lab on the ground floor that bypasses a level change within it. This bypasses the 5 marked medium height steps.
- Photographs 12-15 show the corridors and a seating area on the fourth floor.
- Within the Flour Pilot Plant (just inside the CPE entrance to the building) there is a platform lift that bypasses 15+ marked medium height stairs to the upper level of the plant. The platform lift has a maximum weight of 410kg and only accesses these two levels within the plant (photographs 16 and 17).
Other Floors (Block BC Staircase)
-
Steps
View
- The floors which are accessible by stairs are 1, 2, 3 and 4.
- The stairs are located to the far right and rear of the building.
- The stairs are approximately 3m from the entrance to Block BC staircase.
- There are 15+ steps between floors.
- There are manual, double doors which may be difficult to open to access the stairwell on all floors.
- The lighting levels are moderate to good.
- The steps are clearly marked.
- The steps are medium height (11cm - 17cm).
- The steps do have handrails.
- The steps have a handrail on both sides.
- There is a landing.
Other Floors (Block BB and BC Shared Stairs)
-
Steps
View
- The floors which are accessible by stairs are G, 2, 3 and 4.
- The stairs are located between Blocks BB and BC.
- The stairs are approximately 5m from the entrance to Block BB and BC shared stairs.
- There are 15+ steps between floors.
- There are manual, single doors which may be difficult to open to access the stairwell on all floors.
- The lighting levels are moderate to good.
- The steps are clearly marked.
- The steps are medium height (11cm - 17cm).
- The steps do have handrails.
- The steps have a handrail on both sides.
- There is a landing.
Accessible Toilet
- There are not accessible toilet facilities within this venue.
Standard Toilet(s)
-
Location of Standard Toilet(s)
View
- There are male standard toilets facilities on the lower ground floor, the first floor, the second floor and the fourth floor.
- There are female standard toilets facilities on the ground floor, the third floor and the fifth floor.
-
Standard Toilet Surveyed
View
- A male standard toilet was surveyed.
- The toilet surveyed is located on the ground floor of Block BB and BC shared stairs.
- There is step free access to the standard toilet(s) surveyed from the entrance.
- The standard toilet surveyed is approximately 4m from the entrance to Block BB and BC shared stairs.
- There is not a/are not cubicle(s) suitable for ambulant disabled people in the standard toilet(s) surveyed.
- Lighting levels in the standard toilet surveyed are good.
-
Comments
View
- The female and male standard toilets are located between floors in the stairwell connecting blocks BB and BC.
- The toilet surveyed contains a larger cubicle with a door opening outwards (photograph 9).