
Access Guide
Introduction
- The journey from Liberty Court (16 Briset Square) to Northampton Square is approximately 0.5 miles in length.
- The journey should take approximately 10 minutes to complete.
- There are a variety of surfaces along the route. .
- The route involves crossing some busy roads.
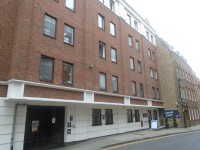
Outside Access (Liberty Court Entrance)
-
Entrance
View
- This information is for the entrance located off Briset Street.
- There is ramped/sloped or stepped access at this entrance.
- The intercom is not in a suitable position to allow wheelchair users to gain access.
- The intercom is at a height of 114cm.
- A key card is required for access at this entrance.
- The card reader/lock is not in a suitable position to allow wheelchair users to gain access.
- There is a canopy or recess which provides weather protection at this entrance.
- The main door(s) open(s) automatically.
- The door(s) is / are single.
- The width of the door opening is 100cm (3ft 3in).
-
Ramp/Slope
View
- There is a ramp/slope at this entrance.
- The ramp/slope is located to the left as you face the entrance.
- The ramp or slope does bypass the step(s).
- The ramp/slope gradient is easy.
- The ramp is permanent.
- There is not a level landing at the top of the ramp.
- The ramp does have handrails.
- The handrails are on both sides.
- The width of the ramp is 110cm (3ft 7in).
-
Step(s)
View
- There is a / are step(s) at this entrance.
- The step(s) is / are located in front of the entrance.
- There is / are 1 step(s) to access the entrance.
- The step(s) is / are not clearly marked.
- The step(s) is / are medium (11cm - 17cm).
- The steps do have handrails.
- The handrails are on both sides.
Briset Street to Passing Alley
- Continue straight on when you reach the bottom of the entrance ramp to the end of Briset Street and then cross St John's Lane. This distance is approximately 55m.
- There are two small service roads you will need to cross. Both are block paved and have drop kerbs on either side. These can be seen in photographs 2 & 3.
- When you reach St Johns Lane head down the brick block paved drop kerb and cross the road using the cobbled drop kerb for Lovell and Christmas to access the pavement on the other side.
- The surface of the road is tarmac.
- The crossing can be seen in photographs 5, 6 & 7.
- On reaching the far side of St John's Lane, turn right and head into Passing Alley. The entrance to which can be seen in photograph 8.
Passing Alley / St John's Street to Clerkenwell Road
- Head along Passing Alley until you reach St John's Street then turn left until you reach Clerkenwell Road.
- Passing Alley has a length of approximately 40m and can be seen in photographs 1, 2, 3 & 4.
- The journey from the alley to Clerkenwell Road is approximately 60m and can be seen in photographs 5, 6, 7 & 8.
- The total distance is approximately 100m.
- The surface of Passing Alley in block paving.
- There is an uphill gradient.
- The width of the passage is over 150cm.
- On reaching St John's Street turn left until you reach Clerkenwell Road.
- The surface of the road is primarily block paving with sections of brick block paving and concrete. Manhole covers are also present.
- There is a slight gradient to the road here.
- As you reach Clerkenwell Road there is a section of tactile paving for a crossing across St John's Street which can be seen in photograph 8. You will need to cross over or bypass this and head instead for the pedestrian crossing in front of you.
Clerkenwell Road to St John's Street
- Cross Clerkenwell Road and continue along St John's Street and cross Albemarle Way. The total distance is 40m.
- There is a pedestrian crossing with tactile drop kerbs on both sides and a central island that is level with the road.
- The road is tarmac.
- The traffic lights have controls at a height of 102cm and an audible prompt and rotating cones.
- The surface of the island is tactile block paving.
- The surface of the road is tarmac.
- There is a camber in the middle of the road.
- The traffic approaches from the right on the near side of the road and from the left on the far side.
- The crossing is about 14m from drop kerb to drop kerb and can be seen in photographs 1, 2, 3 & 4.
- Continue along St John's Street, ignoring the tactile paving to your right. This can be seen in photograph 5.
- The surface of the pavement is block paving with concrete sections and manhole covers (which can be seen in photographs 6 & 7).
- After 22m from the crossing you will reach Albemarle Way there are drop kerbs on either side on the near side this is a mixture of block paving and concrete and on the far side this is a mixture on tarmac and manhole cover. This can be seen in photograph 8.
- The surface of the road is tarmac and traffic only approaches from the left.
St John's Street to Aylesbury Street
- Continue along St John's Street for approximately 130m.
- The surface of the pavement is tarmac with the occasional manhole and concrete section.
- The pavement has a slight uphill gradient as well as a gradient heading down towards the road.
- There is a service road approximately 5m from the Aylesbury Street crossing which can be seen to the rear of photograph 1.
- After 42m there is an uneven concrete service road with drop kerbs on both sides into Mallory Building which you will need to cross. This can be seen in photograph 3.
- There is also an additional tarmac service road you will need to cross. This can be seen in photograph 6.
Aylesbury Street / St John's Street to Skinner Street
- Cross Aylesbury Street and continue down St John's Street until you reach Skinner Street. This distance is 215m.
- To cross Aylesbury Street there are tarmac drop kerbs with manhole covers on either side of the tarmac road.
- Traffic approaches from both directions.
- The surface of the road is tarmac.
- Continue along St John's Street. The surface of the pavement here is block paving with the occasional manhole cover.
- After 30m there is tactile paving for a zebra crossing which you will need to overcome.
- After another 30m there is a tarmac service road with brick block paved drop kerbs on either side.
- After another 100m there is a brick block service road which is level with the pavement.
- As you continue there are some tarmac sections with dimples in them.
- As you approach Sekforde Street you will note brick block areas on either side of the tactile drop kerb.
- The Sekforde Street road is tarmac with traffic only coming from the left.
- The surface of the pavement will now be block paving with the occasional manhole cover.
- As you approach Skinner Street there is brick block paving as well as tactile paving for a crossing across St John's Street.
- Head instead for the crossing across Skinner Street.
Skinner Street to Wyclif Street
- Cross Skinner Street and continue down St John's Street before crossing it at the zebra crossing and heading to Wyclif Street. A distance of 110m.
- There are tactile drop kerbs on either side of the Skinner Street pedestrian crossing.
- There is a level tactile paved island in the middle of the road.
- There is a noticeable camber in the middle of the road.
- The traffic lights have controls at a height of 100cm and an audible prompt and rotating cones.
- Continue along St John's Street. The surface of the pavement is tarmac and after 30m it becomes block paving.
- After 85m you will encounter the zebra crossing you will need to use to cross St John's Street.
- There are tactile kerbs level with the crossing on either side.
- There is a camber in the middle of the tarmac road.
- After this turn left for 10m until you reach the crossing across Wyclif Street.
Wyclif Street to Northampton Square
- Cross Wyclif Street and then turn right and continue until you reach Northampton Square a distance of 80m.
- There are tactile drop kerbs on either side of the tarmac road.
- Traffic goes in both directions.
- After crossing the road turn right.
- The surface of the pavement is block paving and has a slight gradient towards the road.
- There are brick block and cobbled sections along the pavement.
- There are two trees along the pavement which reduce it's width to 140cm.
Northampton Square to University Building Main Entrance
- Upon entering Northampton Square, turn left for 40m heading towards the University Building before turning right and crossing Northampton Square to reach the main entrance.
- The surface of the pavement around Northampton Square is block paving with the occasional manhole cover.
- When after entering Northampton Square, turn left for approximately 40m. When you reach the University Building turn right and for approximately 50m crossing Northampton Square in the process.
- The road here is tarmac and level with the pavement on either side.
- Traffic around the Northampton Square is usually not particularly busy.
- Upon reaching the far side of the square, continue on until you see the entrance on your left.
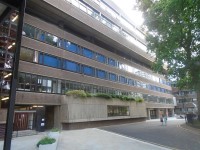
Outside Access (Main Entrance)
-
Entrance
View
- This information is for the entrance located off Northampton Square.
- There is step free access at this entrance.
- The main door(s) open(s) automatically.
- The door(s) is / are single.
- The width of the door opening is 204cm (6ft 8in).
-
Comments
View
- There is an alternative entrance to the left of this entrance which opens automatically towards you.
- The entrance has a width of 164cm.
- There is a swipe-card to use this entrance and an intercom at a height of 110cm.
University Building
- There is level access throughout the University Building via lifts.
- The building provides level access into the Drysdale Building via lift on the ground floor.
- Level access into the Drysdale Building and the Tait Building are on the first floor. Ramped access into the College Building is also on the first floor.
- Services include a cafe/cafeteria facilities, Student Services, library facilities, teaching rooms and lecture theatres.
- There is no designated parking for this building.