
Access Guide
Introduction
- The journey from The Rose Bowl to the Student Village is approximately 0.9 miles. The route should take around 19 minutes to complete. There are numerous slopes along the route of varying gradients. There are busy roads along the route. The pavements along this route may be congested.
- Related link Rose Bowl.
- Https://www.accessable.co.uk/leeds-beckett-university/leeds-beckett-city-campus/access-guides/rose-bowl
Outside Access (Civic Hall Entrance)
-
Entrance
View
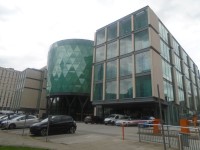
- This information is for the entrance located at the front of the building, opposite Civic Hall.
- There is step free access at this entrance.
- There is not a bell/buzzer.
- There is not an intercom.
- A key card is required for access at this entrance.
- The height of the card reader/lock is 100cm (3ft 3in).
- There is a canopy or recess which provides weather protection at this entrance.
- The main door(s) open(s) automatically.
- The door(s) is / are double.
- The width of the door opening is 185cm (6ft 1in).
-
Second Set of Doors
View
- There is a second set of doors.
- The door(s) open(s) automatically.
- The door(s) is / are double.
- The width of the door opening is 180cm (5ft 11in).
-
Comments
View
- There is an identical entrance to the left hand side.
- A key card is required for out of hours access to this building.
The Rose Bowl to Portland Way
- Turn right upon exiting The Rose Bowl for approximately 44m until you reach Portland Way.
- The surface of the pavement is block paving.
- There is a slight uphill gradient.
- Much of this area is covered by a canopy.
Portland Way to Calverley Street
- Upon reaching Portland Way turn left for approximately 63m until you reach Calverley Road.
- Upon turning left you will immediately encounter the access road into the Rose Bowl / Civic Hall Car Park.
- This has a tarmac surface and has tactile drop kerbs on either side. It can be seen in photographs 1, 2 & 3.
- After this continue along the pavement into Calverley Street.
- The surface of the pavement is block paving with the occasional manhole cover. This can be seen in photographs 4 & 5.
- Near to Calverley Street there is a small section of tactile paving for a crossing over Portland Way.
Calverley Street to Great George Street
- Turn left down Calverley Street until you reach Great George Street. To do this you will need to cross both Calverley Road and Portland Street.
- The surface of the pavement is block paving with the occasional manhole cover.
- There is a downhill gradient.
- This part of the route can be seen in photographs 1, 2 & 3.
- After 64m you will encounter a pedestrian crossing across Calverley Street.
- This has tactile paving on either side of the road and a tarmac central island which is level with the road.
- There are traffic lights at the crossing with controls at a height of 110cm and rotating cones.
- The pedestrian crossing can be seen in photographs 4, 5 & 6.
- Then turn left for 75m until you reach Portland Street.
- This area can be seen in photographs 7, 8 & 9.
- Cross the pedestrian crossing across Portland Street.
- This has tactile paving on either side of the road as well as on the central island.
- There are traffic lights here with controls at a height of 112cm and which have rotating cones.
- The lights here do not make any noise.
- Traffic approaches from the left at both part of the crossing.
- The crossing can be seen in photographs 10, 11 & 12.
- After the crossing continue down Calverley Street for 35m until you reach Great George Street.
- This area can be seen in photographs 13 & 14.
Great George Street to Oxford Place
- Cross Great George Street and then head right for 63m to reach Oxford Place.
- There are tactile drop kerbs on either side of the road.
- There are traffic lights with controls at a height of 112cm and rotating cones are present.
- Traffic approaches the crossing from the right.
- After crossing the road turn right for 63m.
- The surface of the pavement is uneven block paving with the occasional manhole cover.
- There is a downhill gradient.
- There is a slight uphill gradient towards the road.
- This can be seen in photographs 4 & 5.
Oxford Place to Westgate
- Cross Oxford Place at the pedestrian crossing and then turn left for approximately 100m.
- There are tactile drop kerbs either side of the road.
- The traffic lights have controls at a height of 112cm with rotating cones. The lights are silent.
- After crossing the road the road turn left for 100m.
- The surface of the road is block paving.
- There is a downhill gradient towards Westgate.
Westgate to Park Lane
- Turn right down Westgate on leaving Oxford Place and continue for approximately 205m into Park Lane.
- The surface of the pavement is block paving.
- There is a downhill gradient.
- After approximately 40m you will need to cross Oxford Row. There are brick block areas in the pavement. This can be seen in photograph 2.
- After 100m from Oxford Place there is a section of tactile paving for a crossing across Westgate. This can be seen in photograph 5.
- After another 10m you will encounter the pedestrian crossing across Park Street.
- There are tactile drop kerbs on either side of the road.
- The surface of the road is brick block paving.
- The traffic light controls are at a height of 110cm with rotating cones. They are silent.
- There is a noticeable camber at this road.
- The crossing can be seen in photographs 6 & 7.
- After this, continue onwards to Park Lane until you reach the next pedestrian crossing. A distance of approximately 85 metres.
- The surface of the pavement is block paving with brick block sections.
- This area can be seen in photographs 8, 9 & 10.
Park Lane to Hanover Way
- Cross over to the Park Lane central reservation and continue along Park Lane for approximately 255m until you reach Hanover Square.
- The pedestrian crossing to the central reservation has tactile paving on either side of the road.
- The traffic lights have controls at a height of 114cm and rotating cones. They are also silent.
- The road is tarmac.
- Traffic approaches from your right only.
- This can be seen in photographs 1 & 2.
- After this turn right down Park Lane.
- Immediately upon turning right the path is obstructed by the traffic light pole which leaves a width of 130cm to head through. This can be seen in photograph 3.
- The surface of the pavement is block paving.
- There is an uphill gradient.
- There is a large signpost supported by two posts with a width of 143cm between them. This can be seen in photograph 4.
- Approximately 95m after crossing into Park Lane you will find yourself having to cross a tarmac road with tactile drop kerbs on either side. This can be seen in photographs 7 & 8.
- After crossing this road head forward for a few metres before crossing the road to your right. This is very similar and can be seen in photograph 9.
- Turn left and head along Park Lane for another 145m.
- The surface of the pavement is tarmac.
- There is an uphill gradient.
- As you continue along the road you will encounter two signs. One leaves a width of 114cm and the other 120cm.
Hanover Way Crossing
- There is a direct crossing across Hanover Way, however this has no drop kerbs.
- To cross the road with drop kerbs turn right on reaching Hanover Way for about 30m until you reach the crossing for Park House Lane.
- The surface of the pavement is tarmac.
- There is an uphill gradient.
- There is a lamppost as you turn right. This leaves a width of 132cm. It can be seen in photograph 1.
- The crossing across Park House Lane has tactile paving on each side.
- The surface of the road is tarmac.
- This crossing can be seen in photographs 3 & 4.
- After this turn to your left and head to the traffic lights across Hanover Way. The route from the Park House Crossing to the Hanover Way Crossing can be seen in photograph 5.
- The Hanover Way crossing has tactile paving on either side.
- There are traffic lights present. These have controls at a height of 114cm, rotating cones and make noise.
- The surface of the road is tarmac.
- The crossing can be seen in photographs 6 & 7.
- Turn left from the crossing to reach the Leeds City College service road zebra crossing.
- There is a downhill gradient along the pavement to reach this. This can be seen in photograph 8.
- Cross at the zebra crossing which has concrete drop kerbs on either side. It can be seen in photograph 9.
- The surface of the pavement is block paving.
- After crossing at the zebra crossing you will need to head down a path with a width of only 120cm which can be seen in photograph 9.
Park Lane to Burley Street
- Continue along Park Lane until you reach Burley Street. This distance is 100m.
- The surface of the pavement is tarmac to the left and block paving to the right. This can be seen in photograph 1.
- After approximately 35m the surface is simply tarmac.
- This can be seen in photograph 2.
- After 35m there is a section of tactile block paving for a crossing across Park Lane head over it and continue forward. It can be seen in photograph 3.
- After this, continue to Burley Street. The distance is approximately 65m.
Burley Street to St Andrew's Street
- Cross Park Lane into Burley Street.
- The crossing for Park lane has drop kerbs on either side.
- The road is tarmac and has traffic approaching from both ways.
- This crossing can be seen in photographs 1, 2 & 3.
- There is then a small section of tarmac pavement before you encounter a small tarmac road which has drop kerbs on either side.
- This can be seen in photographs 4 & 5.
- After 160m you will find a pedestrian crossing over Burley Street.
- There are tactile drop kerbs on either side.
- There is a clearly marked pedestrian crossing.
- The controls for the traffic lights are at a height of 114cm.
- There are rotating cones present.
- The traffic lights do make a sound when in use.
- This can be seen in photographs 8, 9 & 10.
- Turn right upon crossing Burley Street for 120m until you reach St Andrew's Street.
- The surface of the pavement is tarmac.
- The pavement width is reduced to 143cm by a bus stop. This can be seen in photograph 13.
- There are two lampposts which reduce the width of the pavement to only 143cm and then 130cm.
- These can be seen in photographs 14 & 15.
- There is an easy downhill gradient located here.
St Andrew's Street to Student Village Reception Entrance
- Cross St Andrew's Street then continue to the moderate ramp. Once at the bottom of this ramp head towards the Student Village for approximately 180m.
- The crossing for St Andrew's Road has tactile block paved ramps on either side. The road is tarmac and can be seen in photographs 1 & 2.
- Head forward for 13m until you reach the ramp down the embankment to your left. As you head towards the ramp the surface of the pavement is tarmac. This area can be seen in photograph 3.
- The ramp is moderate and has handrails on either side. It can be seen in photographs 4, 5 & 6.
- At the bottom of the ramp turn right for 50m until you reach the crossing across the road.
- Along this pavement there is a lamppost which reduces the width of the pavement to about 110cm.
- Cross the tarmac road at the crossing which has drop kerbs on either side of the road. This can be seen in photographs 8 & 9.
- The road heading down to the Student Village Reception Entrance has bollards preventing vehicular entry. The widths between each of these bollards varies though the width between many of them is over 100cm. These can be seen in photograph 10.
- After this head down the road which is paved with brick block paving approximately 40m before turning right to reach the Student Village Reception entrance.
- The road down to the Student Village Reception Entrance can be seen in photograph 11.
Outside Access (Leeds Student Village Reception Entrance)
-
Entrance
View
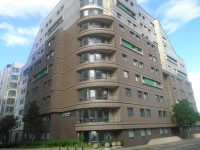
- This information is for the entrance located off 5 Burley Street.
- There is ramped/sloped access at this entrance.
- The main door(s) open(s) automatically.
- The door(s) is / are double.
- The width of the door opening is 112cm (3ft 8in).
- There is a small lip on the threshold of the entrance, with a height of 2cm or below.
-
Ramp/Slope
View
- There is a ramp/slope at this entrance.
- The ramp/slope is located in front of the entrance.
- The ramp/slope gradient is easy.
- The ramp is permanent.