
Access Guide
Route Information
- The following information describes the route from Rotherham Central Station to Rotherham Leisure Complex.
- The approximate distance of this route is 0.9km.
- The route takes approximately 10-15 minutes.
- The route leads down Bridge Street, along Frederick Street and Centenary Way to Effingham Street and then the Leisure Centre.
- The majority of paths along the route are tarmac with some slight gradients in places.
- There is limited street signage located along the route directing you to the Leisure Complex.
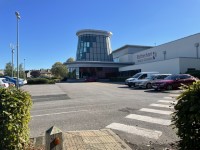
- There is public parking located next to the Rotherham Leisure Complex.
- The potential hazards on this route include busy roads, crossing points and congested pathways.
- The visual indicators at the crossing points are activated by push buttons, these are between the heights of 95cm and 105cm.
Starting Point - Rotherham Central Station
Central Road to Bridge Street
- Exit Rotherham Central Station via the main entrance and cross over Central Road on the left.
- The crossing is level.
- The crossing is not marked.
- There is tactile paving on both sides of the crossing.
- Traffic could come from both directions.
- After crossing Central Road, go over the bridge and turn to the left and follow the path round.
- This leads onto Bridge Street.
Bridge Street to Bridgegate
- After turning right onto Bridge Street continue straight ahead.
- The path here has an easy slope all the way along.
- The path along this section is a mixture of block paving and paving slabs.
- There are some signs outside some of the businesses along the path.
- There are drains at various points along the path that can cause uneven surfaces.
Bridgegate to Frederick Street to Drummond Street
- Cross over Bridgegate and continue up Frederick Street for approximately 70m.
- This street is a pedestrian only zone.
- The surface is block paving and concrete paving slabs.
- The surface is uneven.
- At the 'pedestrian zone ends' sign bear left and cross over Water Street.
- The crossing has a dropped kerb with tactile paving.
- The traffic is coming from the right.
- Continue on for 30m then cross Effingham Square on the right.
- The crossing has a dropped kerb with tactile paving.
- The traffic is coming from the left.
- Once you have completed the crossing turn left onto Drummond Street.
Drummond Street to Drummond Street Crossing
- On Drummond Street turn left and cross at the pedestrian crossing in front of the bus interchange.
Drummond Street Crossing
- The crossing consists of two pedestrian crossings with a central island.
- At the first crossing point traffic approaches from your right.
- At the second crossing point traffic approaches from your left.
- There are dropped kerbs with tactile paving at each crossing point.
- The surface of each crossing point is concrete tiles.
- Each crossing point is controlled by a visual indicator.
- The visual indicators are activated by push buttons at a height of 110cm.
- There are rotating cones located at the base of the push button boxes to indicate when it is safe to cross. The cones are 105cm high.
- After the crossing, continue for 25 metres towards the dual carriageway in front of you.
Drummond Street Crossing to Centenary Way
- Once across the Drummond Street crossing continue along Drummond Street to the dual carriageway.
Centenary Way Dual Carriageway Crossing
- At the crossing on Centenary Way, cross over both sides of the dual carriageway at the pedestrian crossing.
- This crossing point consists of two crossings with a central island.
- At the first crossing point traffic approaches from your right.
- At the second crossing point traffic approaches from your left.
- There are dropped kerbs with tactile paving at each crossing point.
- The surface of each crossing point is concrete tiles.
- Each crossing point is controlled by a visual indicator.
- The visual indicators are activated by push buttons at a height of 110cm.
- There are rotating cones located at the base of the push button boxes to indicate when it is safe to cross.
Centenary Way Crossing to Effingham Street
- Once across the dual carriageway turn right and follow Centenary Way for 30 metres.
- At the sign for the leisure complex take the middle of the three paths onto Effingham Street.
Effingham Street to Car Park Entrance
- Continue down Effingham Street and cross over the car park entrance at the dropped kerb.
Car Park Entrance Crossing
- The car park crossing has dropped kerbs and tactile paving.
- The traffic approaches from the left and right.
Car Park Entrance to Kenneth Street
- After crossing the car park entrance continue on Effingham Street to Kenneth Street.
Kenneth Street Crossing
- The crossing has dropped kerbs and tactile paving.
- The traffic approaches from the left and right.
Kenneth Street Crossing to Grafton Street Crossing
- After crossing Kenneth Street continue along Effingham Way to Grafton Street.
Grafton Street Crossing
- The crossing has dropped kerbs and tactile paving.
- The traffic approaches from the left and right.
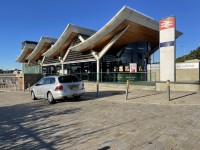
Grafton Street Crossing to Rotherham Leisure Centre
- After crossing Grafton Street continue ahead.
- As you approach the leisure complex there is a tarmac path with a slight gradient which leads to a pedestrian crossing within the car park.
- The crossing has dropped kerbs and tactile paving and has black and white stripes.
- The traffic approaches from both sides.
- After the crossing follow the path round to the left then to the right until you reach the main entrance to the Leisure Complex.