
Access Guide
Introduction
- The route covers a distance of 0.9 miles which should take an approximate 19 minutes to complete. .
- There are easy and steep slopes along the route. .
- There are concrete, block paved and tarmac surfaces along the route. .
- The route includes road crossing some of which have zebra crossings. .
- This route travels past University Square and Technology Park.
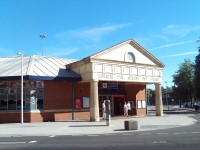
Rachel Poole Bus Station
- The surface of the flooring within the bus station is block paving with tactile paths running throughout.
- There are sections of tactile path leading out of the bus station onto Fairfax Street.
- There are two exits here. One is a double set of automatic doors that open towards you and a single manual sliding door. Both have widths of over 150cm.
- There are toilets, shops and other facilities within the bus station.
Bus Station to Priory Lane
- Turn right on exiting the station and head to the zebra crossing across Fairfax Road a distance of approximately 13m. This area can be seen in photographs 1 and 2.
- The surface of the pavement is block paving with a slight gradient leading down towards the road.
- The road and the zebra crossing can be seen in photograph 3.
- There are sections of tactile paving on either side of the road.
- There is a central island in the middle of the road which has tactile paving.
- Traffic approaches to your right as you head to the island and to your left as you leave it.
- On reaching the other side of Fairfax Road turn left until you reach Priory Road a distance of 18m as shown in photograph 4.
- The total distance of this area is 40m.
Priory Lane to Bayley Lane
- Turn right up Priory Lane. The surface of the pavement is block paving.
- There is a steep uphill gradient present which can be seen in photographs 2 and 3.
- On the other side of the Lane is Priory Hall.
- After 65m you will encounter a section of cobbled paving with a manhole cover in it. This can be seen in photographs 4 and 5.
- After this crossing this section you will find Coventry Cathedral will be to your right. The Cathedral can be seen in photograph 7.
- Keep going uphill along Priory Lane.
- As you reach the area leading to the main entrance to the Cathedral there are sections of cobbled paving. Continue over them until you reach the tactile drop kerb for a crossing over the lane. The cobbled section can be seen in photographs 8 and 9.
- Cross the lane here. There is a tactile drop kerb on the other side.
- The surface of the road at the crossing is block paving.
- Traffic is infrequent but may come from your right.
- The road and crossing can be seen in photographs 10 and 11.
- This area of the guide is approximately 190m in length.
Bayley Lane to Jordan Well
- Turn right and follow the footpath until you reach Jordan Well.
- After 3m there are a few obstacles on the pavement which reduce the width of the pavement to 138cm. These can be seen in photograph 1.
- The surface of the pavement is block paving with the occasional manhole cover. There is also a noticeable uphill gradient. As shown in photographs 2 and 3.
- There is a tactile drop kerb to cross Bayley Lane. Along the path there are two tactile drop kerbs for crossing Bayley Lane which should be ignored. The first drop kerb can be seen in photograph 4. Photograph 5 shows the stretch of pavement between them.
- There is a reduction in the width of the pavement to a minimum of 120cm due to the presence of a lamppost. Photograph 6 shows both the lamppost and the second drop kerb.
- As you continue on, there will be a drop kerb along the pavement and towards the end of Bayley Lane the gradient of the pavement will become downhill. This area can be seen in photographs 7 and 8.
- The distance is approximately 105m.
Little Park Street to St John's Street
- Turn left on reaching Little Park Street and continue for until you reach St Johns Street.
- After 11m you will encounter an easy downwards slope as shown in photographs 2 and 3.
- Head down it and continue along until you reach St John's Street. On the way you will encounter tactile paving for a zebra crossing as shown in photograph 4.
- Continue past this until you reach St John Street. This part of the route can be seen in photographs 5 and 6.
- The distance is approximately 150m.
Jordan Well to Little Park Street via Earl Street
- On reaching Jordan Well, use the zebra crossing in front of you to reach Earl Street.
- To your right as you approach the crossing is a section of tactile paving. Ignore this and head onto the zebra crossing. This can be seen in photograph 1.
- The zebra crossing has tactile drop kerbs on either side with traffic coming from your right. The crossing is visible in photograph 2.
- On reaching the other side turn right and head onward until you reach Little Park Street.
- The surface of the pavement is block paving and there is an easy uphill gradient as shown in photographs 3 and 4.
- There area is cloistered by the court building above.
- As your approach Little Park Street there is an easy slope with brick block paving at the top. This slope is approximately 64m from the zebra crossing and can be seen shown in photograph 5.
- There is then a section of differently textured block paving (photograph 6) before encountering another easy slope leading onto Little Park Street (photograph 7).
- The distance of this part of the route is approximately 105m.
Subway to Park Road
- The subway has a steep downward slope with a handrail to the right going down. As shown in photographs 1 and 2.
- The pavement is block paving with the occasional tactile section and with gutters present.
- As you continue along the you will enter a tunnel there is no handrail in the tunnel. The tunnel is shown in photographs 3, 4 and 5.
- As you exit the tunnel head up the steep slope to your left which has a handrail to your left. The steep slope can be seen in photographs 6 and 7.
- At the top, turn left across the bridge which can be seen in photograph 8 and past the Martyrs Field memorial visible in photograph 9.
- After this head down into the subway again.
- There is here a steep slope with a handrail to your left. As shown in photograph 10.
- At the bottom of the slope there is a tunnel head through it and turn left.
- This covers a distance of 150m.
St John's Street to Subway
- Cross St John's Street. The crossing has tactile drop kerbs on either side.
- The road is tarmac and has traffic approaching from the left. The crossing and road can be seen in photographs 1 and 2.
- Turn right after crossing St John's Street and continue until you reach the subway.
- The surface of the pavement is concrete but after a few metres becomes block paving. This can be seen in photograph 3.
- After 25m there is a service road into a car park. The surface of which is concrete, seen in photograph 4.
- After this the surface of the pavement becomes an uneven mix of block paving and tarmac, seen in photograph 5.
- There are also a few metres after the service road a tactile drop kerb for a zebra crossing ignore and continue past this as seen in photograph 6.
- 35m after the service road you will encounter a small service road in front of the Coventry Central police station. This can be seen in photographs 7 and 8.
- There are drop kerbs on either side.
- After this keep going until you reach the subway, as seen in photograph 9.
- This section covers a distance of approximately 120m.
Subway Exit
- As you exit the tunnel section turn left. The pathway is a steep slope that circles to the left then right with a handrail on the left. As shown in photographs 1, 2 and 3.
- The area at the top of the slope can be seen in photograph 4.
Quinton Road to Mile Lane
- Turn left up a steep uphill slope on the pathway which is mainly block paving with some concrete patched sections and is uneven in places as the path circles to the left. As shown in photographs 1 and 2.
- Follow the path for about 19 metres and pass Listers Volkswagen on your right hand side. As shown in photographs 3 and 4.
- The pathway is still block paving with some sections that are concrete patches. As shown in photographs 7 and 8.
- There is some tactile paving throughout section as various parts.
- The length covered in this section of the route is about 32 metres.
Mile Lane to Elm Bank Car Park Entrance
- Continuing right into Mile Lane on an easy slope uphill on a pathway that is now concrete, passing Listers Volkswagen on your right. As shown in photographs 1 and 2.
- After about 8 metres you will reach a pedestrian crossing with tactile paving where the path narrows to 125cm in width as you pass the crossing. As shown in photographs 3, 4 and 5.
- Continuing ahead a further 16 metres you will cross a side road with dropped kerbs and no tactile paving with NTDC Coventry University on your left as you cross. As shown in photographs 6, 7 and 8.
- As you continue along Mile Lane for a further 12 metres you will see HDTI Coventry University on the left and the Elm Bank Coventry University approaching on your right. As shown in photographs 9, 10 and 11.
- Continuing along Mile Lane you will continue to pass Elm Bank Coventry University on your right for a further 14 metres on a pathway that is on an uphill steep slope with both concrete and block paving as a pathway.
- As you continue along Mile Lane a further 8 metres you will approach the entrance to Elm Bank Coventry University car park on your right. This entrance has a steep slope towards car park. As shown in photographs 13 and 14.
- You will see HDTI Coventry University on the left opposite. As shown in photograph 14.
- The Length covered in this section of the route is about 106 metres.
Elm Bank Car Park Entrance to Puma Way Junction
- Continuing ahead along Mile Lane, the pathway is concrete with an easy slope uphill.
- You will approach Cyril Maudslays Coventry University Building on your right after 10 metres and cross the quite side road entry to the car park to Cyril Maudslays. This crossing has an easy slope leading into the side road. As shown in photographs 2, 3 and 4.
- Continuing on a further 4 metres you approach a pedestrian crossing with tactile paving and dropped kerbs to cross Mile End Lane for Puma Way. As shown in Photographs 6 and 7. Use this crossing for Puma Way.
- Continuing ahead a further 10 metres you reach a crossing over Merlin Close which has tactile paving and dropped kerbs. As shown in photographs 8, 9 and 10. The path at this crossing changes from concrete to tarmac and then back to concrete as you reach the other side.
- The path is on an easy slope uphill.
- On your right after you have crossed the crossing there is a pathway leading to the CU Coventry Mile Lane new building. As shown in photographs 11, 12 and 13.
- As you look to your right you will see Puma Way. As shown in photograph 14.
- The length covered in this section of the route is about 91 metres.