
Access Guide
Introduction
- The total distance of the route is about 900 metres or 0.56miles. The total time the route should take to walk is about 14 minutes.
- The route does have several easy slopes and mainly wide paths, with some uneven surfaces due to uneven paving and several roads to cross with dropped kerbs and pedestrian crossings.
There are many busy roads along the route. Some areas of the route may be congested. - Related link Rose Bowl.
- Https://www.accessable.co.uk/leeds-beckett-university/leeds-beckett-city-campus/access-guides/rose-bowl
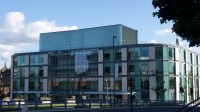
Outside Access (Civic Hall Entrance)
-
Entrance
View
- This information is for the entrance located at the front of the building, opposite Civic Hall.
- There is step free access at this entrance.
- There is not a bell/buzzer.
- There is not an intercom.
- A key card is required for access at this entrance.
- The height of the card reader/lock is 100cm (3ft 3in).
- There is a canopy or recess which provides weather protection at this entrance.
- The main door(s) open(s) automatically.
- The door(s) is / are double.
- The width of the door opening is 185cm (6ft 1in).
-
Second Set of Doors
View
- There is a second set of doors.
- The door(s) open(s) automatically.
- The door(s) is / are double.
- The width of the door opening is 180cm (5ft 11in).
-
Comments
View
- There is an identical entrance to the left hand side.
- A key card is required for out of hours access to this building.
The Rose Bowl to Portland Crescent
- Upon exiting The Rose Bowl via the Civic Hall Entrance turn left for 35m, then turn right and cross the car park entrance road.
- Turn left for 30m to reach Portland Crescent.
- The surface of the pavement is brick block paving.
- There are obstacles as you turn left with a width between them of 120cm. These can be seen in photograph 4.
- There is a block paved drop kerb on the near side of the crossing.
- There is a brick block paved drop kerb on the far side of the crossing.
- The road in between has a tarmac surface.
- The crossing can be seen in photographs 5 & 6.
Portland Crescent / Millennium Square to Cookridge Street
- After crossing the road continue up Portland Crescent for approximately 30m.
- The surface of both Portland Crescent and Millennium Square is block paving.
- There is a downhill gradient.
- This part of the route is shown in photograph 1.
- After 30m you will reach some Bollards separating the Portland Crescent from Millennium Square. These have a width of 120cm and can be seen in photograph 2.
- Continue on for 100m into the main part of Millennium Square. This part of the journey is shown in photographs 3 & 4.
- Upon reaching the main area of Millennium Square (an area shown in photograph 5) turn left and head towards Cookridge Street passed the Electric Press.
- There is approximately 60m between here and Cookridge Street. This part of the journey can be seen in photograph 6.
Cookridge Street to Great George Street
- Turn right and head down Cookridge Street for approximately 65m.
- There is a downhill gradient as you head towards Great George Street.
- The surface of the pavement is block paving with the occasional manhole cover.
- After about 20m there are bollards with a width of about 140cm between them.
- There is a bin in the road after an additional 4m which has a width of 120cm around it. This can be seen in photograph 3.
- Immediately after this there is a lamppost which reduces the width of the pavement to 130cm.
- Continue downhill for another 40m until you reach Great George Street. This can be seen in photograph 4 & 5.
- As you reach Great George Street there is a section of brick block paving.
Cross Great George Street
- Cross Great George Street and head to Millennium Square. This distance is approximately 60m.
- There are traffic lights on either side of Great George Street with controls at a height of 110cm and rotating cones present.
- There are tactile drop kerbs on either side of the road.
- The surface of the road is tarmac.
- Traffic approaches from the right only.
Cookridge Street
- Upon crossing Great George Street continue down Cookridge Street until you reach the second pedestrian across Cookridge Street.
- The surface of the pavement is block paving with the occasional manhole cover and concrete section.
- As soon as you start down Cookridge Street there is some tactile paving for the pedestrian crossing across the road. Continue on until you reach the next crossing. This crossing can be seen in photograph 1.
- Shortly after this there is a bin along the pavement which reduces the pavement width to 110cm.
- There is a service road after 20m which is level with the pavement and is cobbled. It can be seen in photograph 3.
- You when encounter the gap between to polls holding up a traffic sign with a width of 117cm. This can be seen in photograph 4.
- Continue on after this to the end of Cookridge Street where on your left you will find a pedestrian crossing across Cookridge Street.
Cross Cookridge Street and The Headrow
- Use the pedestrian crossing to cross Cookridge Street.
- The pedestrian crossing over Cookridge Street has traffic lights at the pedestrian crossing which have a height at 110cm and rotating cones as well as tactile drop kerbs on each side.
- Traffic will be approaching from the right only.
- The pedestrian crossing over Cookridge Street can be seen in photographs 1, 2, 3 & 4.
- Head straight on for 15m and use the crossing to your right to cross The Headrow.
- Between the two crossings the surface of the pavement is block paving.
- There is a slight uphill gradient to reach The Headrow crossing.
- There is a cycle path to your right which is marked by tactile paving. This area is shown in photograph 5.
- Cross The Headrow.
- There are traffic lights at the pedestrian crossing which have a height at 110cm and rotating cones.
- There are tactile drop kerbs on either side of the road and on either side of a central island.
- The central island has a brick block paved surface.
- The surface of the road is tarmac.
- On the near side of the road traffic approaches from the right and on the far side the left.
- This is a busy road.
- This crossing can be seen in photographs 5, 6, 7, 8 & 9.
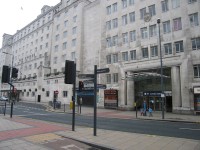
Park Row
- After crossing The Headrow head downhill down Park Row for approximately 195m and then cross Park Row at the pedestrian crossing.
- As you start down Park Row there is a section of tactile paving for a crossing across Park Row. Pass over this and continue down Park Row. This can be seen in photograph 1.
- The surface of the pavement is block paving with the occasional manhole cover.
- After approximately 12m there is a lamppost which reduces the width of the pavement but this should remain at over 100cm. This is also dependent on the positioning of the seating at the café located to the lampposts left. This can be seen in photograph 2.
- There is a bin located along the path just beyond this which also reduces the width of the pavement though this will remain above 100cm. This can be seen in photograph 4.
- After 45m there is a section of tactile paving to cross park Row this can be seen in photograph 4.
- After this continue for 150m until you reach the next pedestrian crossing over Park Row. This part of the route can be seen in photographs 5, 6, 7, 8, 9 & 10.
- There are some parts of the pavement as shown in photograph 9 that have a tarmac service to your left when you walk down Park Row.
Park Row to City Square
- Cross Park Row at the pedestrian crossing.
- This crossing has tactile drops kerbs on either side of the tarmac road.
- The traffic lights have a height of 112cm and have rotating cones.
- The pedestrian crossing can be seen in photographs 1, 2, 3 & 4.
- Upon reaching the other side of Park Row turn left and head down Park Row for approximately 100m until you come to the pedestrian crossing from Park Row to City Square.
- The surface of the pavement is block paving with the occasional manhole cover.
- There is an easy gradient as you head down the road.
- This part of the route can be seen in photographs 5, 6, 7, 8.
- Use the crossing to reach City Square.
- After crossing the square you will need to use two sets of traffic lights to reach City Square.
- Both these sets of traffic lights have tactile paving on either side, controls at a height of 110cm and rotating cones.
- The surface of the road is tarmac.
- At using the first set of traffic lights to reach the central island turn to your right and use the next set to travel onto City Square.
- At both parts of this crossing traffic approaches from the right.
- There is a lot of traffic travelling along this road.
- The crossing can be seen in photographs 9, 10, 11 & 12.
City Square to Leeds Station
- After crossing into City Square continue forward for 65m to cross City Square and head to the pedestrian crossings across Quebec Street and Wellington Street. After doing so use the pedestrian crossing to cross to Park Row.
- The surface of Park Square is block paving.
- There are obstacles that may need to be avoided as you cross the square. These can be seen in photograph 1.
- As you cross the square there is a gentle downhill gradient.
- The square can be seen in photographs 1, 2 & 3.
- Cross Quebec at the pedestrian crossing.
- There are tactile drop kerbs on either side of the road.
- The surface of the pavement is block paving.
- Traffic approaches the road from the left.
- The controls are at a height of 112cm and there are rotating cones present.
- The surface of the road is tarmac.
- After crossing Quebec Street continue for 6m until you reach the Wellington Street crossing.
- The crossing over Wellington Street is very similar to that over Quebec Street.
- After crossing the road continue on the Wellington Street entrance to the station is directly in front of you.
Leeds Station Wellington Street Entrance
- There are bollards immediately beyond the entrance that have a width of 117cm. This can be seen in photograph 1.
- There are single permanently held open sliding doors as well as double manual doors to enter the station off Wellington Street. This can be seen in photograph 2.
- There is an easy downwards slope immediately beyond the entrance doors. This can be seen in photographs 3.
Leeds Railway Station
- Leeds Station has 17 platforms in total which are all accessible step free via lift.
- There is step free access along the station concourse and step free access on the entrances/exits.
- There are accessible toilets located in the south concourse, on platform 8c and within the station building between platforms 12B and 15B.
- There are standard toilets located on many of the platforms as well as within the ticket counter area and in the South Concourse. There is a small charge to use the toilets in the South Concourse.
- There are numerous restaurants and shops within the station.
- There is seating throughout the main entrance concourse (shown in photograph 4 and 5).
- There are three car parks available for the station: a short stay car park, a multi deck car park and a long stay car park.
- There are direct services from Leeds to London, York, Manchester, Sheffield, Newcastle, Hull, Liverpool, Edinburgh and many more local destinations.