Access Guide
Shared Section (Useful Information)
Useful Information
- Suug The Disability and Neurodiversity team are located in Founder's East. They offer support and information to students who have disclosed a disability, long standing medical condition, specific learning difficulty or mental health condition. Drop in online or go to FE153 on Tuesday, Wednesday or Thursday 11am to 2pm.
- To see more information on the Disability and Neurodiversity team please click here (opens new tab).
- Telephone Number: 01784 414 621.
- Email: [email protected].
- The Student Services Centre offers help and advice to all students.
- To see more information on Student Services Centre please click here (opens new tab).
- Telephone Number: 01784 276 641.
- Email: [email protected].
- To see more information on Accommodation please click here (opens new tab).
Introduction
- This route is from Egham Station to Founders Square via Station Road, High Street and Egham Hill. This route is approximately 1.8km long and takes around 25 minutes to complete by foot.
- The main hazards along this route include uncontrolled road crossings, steep slopes and congested pedestrian areas.
Egham Station to School Lane
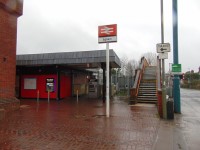
- Exit the station and turn right onto Station Road.
- Continue straight for approximately 25m.
- The pavement has an even and level brick block surface becoming tarmac.
- Cross School Lane.
- This crossing has dropped kerbs and tactile paving on both sides.
- This crossing is shown in photographs 3 and 4.
School Lane to Grange Road Crossing
- Continue straight along Station Road.
- The pavement has an even and level tarmac surface.
- After approximately 110m turn left to cross Station Road.
- This is a traffic light controlled crossing with a level central island, tactile paving and dropped kerbs on both sides.
- This crossing is shown in photographs 6, 7, 8 and 9.
- Continue straight after crossing and head along Church Road.
- The pavement here has an even and level tarmac surface.
- After approximately 55m there is a section of tactile paving (shown in photograph 12) and a dropped kerb on the right of the pavement.
- Approximately 10m after the tactile paving cross Grange Road.
- This crossing has dropped kerbs on both sides with no tactile paving.
- This crossing is shown in photographs 13 and 14.
Grange Road Crossing to Limes Road
- Continue straight along Church Road.
- The pavement here has an even and level tarmac surface.
- The pavement bears left after approximately 30m.
- After another approximately 30m the pavement is narrowed by advertising and sandwich boards outside shops shown in photographs 4, 5 and 6.
- Cross Blue Ball Lane.
- This crossing has dropped kerbs with no tactile paving on both sides.
- This crossing is shown in photographs 7 and 8.
- Continue straight for approximately 120m to Limes Road.
- This pavement has an even and level tarmac surface.
Limes Road Crossing to Sweeps Lane
- Cross Limes Road.
- This crossing has dropped kerbs on both sides with no tactile paving.
- This crossing is shown in photographs 1 and 2.
- After approximately 10m cross the Limes Mews and Petrol Station entrance and exit.
- This crossing is approximately 30m long and level with no tactile paving.
- This crossing is shown in photographs 3, 4 and 5.
- Approximately 10m beyond the petrol station cross the car park access road.
- This crossing is quiet with dropped kerbs and tactile paving on both sides.
- This crossing is shown in photographs 7 and 8.
- Continue straight along the High Street for approximately 60m to Sweeps Lane.
- This section of pavement contains signposts, sandwich boards and advertising materials.
Sweeps Lane Crossing to Middle Hill Bus Stop
- Cross Sweeps Lane.
- This crossing has dropped kerbs with no tactile paving.
- This crossing is shown in photographs 1 and 2.
- After crossing Sweeps Lane head straight towards Egham Hill.
- After approximately 15m follow the pavement bearing left along the side of Egham Hill.
- Cross the petrol station access road.
- This petrol station was closed for building works at the time of the survey.
- This crossing has dropped kerbs and tactile paving on both sides.
- This crossing is shown in photographs 5 and 6.
- Continue straight along Egham Hill.
- After approximately 10m cross the additional petrol station access road.
- This crossing has dropped kerbs and tactile paving on both sides.
- This crossing is shown in photographs 8 and 9.
- Continue along Egham Hill.
- The pavement has an even tarmac surface with a slight uphill gradient.
- After approximately 100m there is a section of tactile paving with a dropped kerb located on the right side of the pavement, as shown in photograph 11.
- Continue along Egham Hill for approximately 120m to the Middle Hill Bus Stop.
Middle Hill Bus Stop to RHUL North Pedestrian Entrance
- Continue past the Middle Hill bus stop.
- The pavement has a tarmac surface with a slight gradient.
- After approximately 120m there is a section of tactile paving with a dropped kerb on the right side of the pavement, marking an uncontrolled road crossing. This section is shown in photograph 5.
- Continue along Egham Hill for approximately 100m to cross The Pad accommodation access road.
- This crossing has dropped kerbs and tactile paving on both sides of the crossing.
- This crossing is shown in photographs 8 and 9.
- Continue along Egham Hill.
- After 40m there is a section of tactile paving with a dropped kerb on the right side of the pavement, shown in photograph 11.
- Continue along Egham Hill for approximately 40m to the RHUL North Pedestrian Entrance.
RHUL North Pedestrian Entrance to the RHUL South Entrance (Egham Hill A30)
- Cross the RHUL North Pedestrian Entrance.
- This crossing has dropped kerbs and tactile paving on both sides.
- This crossing is shown in photographs 1 and 2.
- After approximately 10m there is a line of corduroy tactile paving, shown in photograph 3.
- This tactile paving marks where the cycle path and pedestrian path splits, keep to the left of the pavement.
- After approximately 100m along Egham Hill a line of corduroy tactile paving marks the pedestrian and cycle paths merging, shown in photograph 6.
- After approximately 80m the pavement narrows to 100cm for approximately 10m, shown in photographs 8 and 9.
- After approximately 40m the Chestnut Drive bus stop is located on the left of the pavement.
- Continue along Egham Hill for approximately 140m.
- A line of tactile paving is across the pavement marks the traffic light controlled crossing that leads to the George Elliot accommodation buildings.
- Approximately 10m beyond the tactile paving traffic light crossing there is a line of corduroy tactile paving marking the splitting of the pedestrian and cycle paths.
- Turn left approximately 10m after the corduroy tactile paving to enter the RHUL Campus.
Egham Hill (A30) to University Access Road Windsor Building Crossing
- The entrance to the Royal Holloway Campus is an open gateway 120cm wide.
- Head along the path into the campus.
- This path has a level and even tarmac surface.
- After approximately 30m cross the university access road.
- This is a level zebra crossing with no tactile paving.
- This crossing is shown in photographs 3 and 4.
- Continue along the path.
- After approximately 30m turn right to follow the pavement alongside the main university access road.
- The pavement is even and level with a tarmac surface.
- Continue along the pavement for approximately 35m to the zebra crossing in front of the Windsor Building.
University Access Road Windsor Building Crossing to Founders Square
- Cross the main university access road.
- This is a level zebra crossing with tactile paving on the near side only.
- This crossing is shown in photographs 1 and 2.
- Head along the path directly in front bearing to the right along the side of the Windsor Building.
- Once past the front of the Windsor Building join the path ahead bearing slightly right, shown in photographs 4 and 5.
- Approximately 30m along the path turn left along the side of the Founders Building.
- Head for approximately 60m down the path along the side of the Founders Building to the Founders Square.
- This path is even with a tarmac surface and a slight downhill gradient.
Founders Square
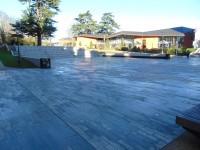
- The Founders Square is an open events space located between the Emily Wilding Davison Building and the Founders Building.
- This area is accessed via steps or ramps from the Emily Wilding Davison Building, by ramped access from the north of the campus and stepped access only from the south.
- This area has a level and even stone slab surface.
- This area contains a wide open space lined with bench seating on three sides (as shown in photographs 5 and 6) and by a tiered stone bench seating array on the north side of the square. This tiered seating is access via 15+, medium height steps with handrails on the left only.


