

Access Guide
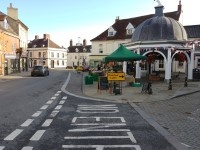
Bungay Streetscape
- This guide is based in Bungay Town Centre, and covers the main town centre area.
- This guide covers the main shopping area of Bungay along with some local landmarks.
- This guide runs from Wharton Street car park to the south of the main town centre, and then through Bungay town centre, with branches that lead to some key venues. It finishes at Scales Street/A144 to the north of the town. The route is roughly around 0.8 miles (805 metres) long, and would take roughly 15-20 minutes to walk on average, but this is just a guide.
- The route has some slight and steep slopes along it.
- Pathway surfaces are concrete paving slabs, block paving, tarmac and a few areas of loose chippings.
- The pathways have some uneven sections, which include some raised manhole covers.
- The road surfaces are tarmac with some block paving. There are dropped kerbs and tactile paving at most crossing points.
- There are opportunities to sit and rest.
Getting Here
- By Car
- The A143 is approximately 0.2 miles away from Scales Street/A144, to the north of the town centre. This is via A144 Broad Street.
- Parking
- There is limited on street Blue Badge parking and standard parking available on A144 Broad Street and the surrounding side roads. There are several public car parks are also available along the route of the shopping area guide.
- By Bus
- There are several bus stops along most of the route with direct services available to Ipswich, Great Yarmouth, Norwich, Diss and Lowestoft
- For more information on Border Buses please see the following link:-https://www.border-bus.co.uk/
- For more information on First Buses please see the following link:-https://www.firstbus.co.uk/norfolk-suffolk
- By Train
- Beccles Station is located on Station Road, approximately 6.2 miles from Bungay town centre
- There is step-free access to all platforms at this station via lift.
- There are direct train services available to Ipswich and Lowestoft.
- For more information on Greater Anglia Trains please see the following link:-https://www.greateranglia.co.uk/.
On-Street Parking
- On-Street Parking
- There are limited Blue Badge and standard on street parking bays along the route, and on surrounding side roads such as Broad Street, St Mary’s Street and Lower Olland Street.
- There is no charge for these parking bays.
- Parking is time limited for non-Blue Badge holders depending on the parking area.
- Blue Badge holders may park in any of the bays for a maximum of 2 hours.
Wharton Street Car Park
- This is a pay and display car park.
Priory Lane Car Park
- This is a pay and display car park.
Scales Street Car Park
- This is a pay and display car park.
Junction – Lower Olland Street (A144) and Wharton Street
- There are crossings at this junction over Lower Olland Street and Wharton Street.
- The crossing over Wharton Street is the only crossing that has dropped kerbs and tactile paving on both sides.
- The pathways are concrete and block paving.
- The surface of the road at all crossings is tarmac.
- There is one way traffic from Wharton Street into Lower Olland Street with traffic exiting from Wharton Street into Lower Olland Street and same applies on Lower Olland Street with traffic travelling in the direction of Wharton Street towards Upper Olland Street.
- The pathways are fairly narrow and are uneven in places.
- There are some obstructions along the pavement on both sides, such as railings, cycle racks, bus stops, bins and signboards.
Wharton Street to Upper Olland Street via Lower Olland Street (A144)
- The road is a one way road with traffic travelling in the direction of Wharton Street towards Upper Olland Street and will be difficult to cross except for allocated crossing places.
- The surface of the road at all crossings is tarmac.
- The pathways on both sides of the road in this section are formed of concrete tiles and tarmac.
- The pathways on both sides are narrow.
- There are some uneven areas on the pathways throughout this section.
- There are some obstructions along the pavement on both sides, such as railings, cycle racks, bus stops, bins and signboards.
- There are some side entrances to cross along the section, most have dropped kerbs, but most don’t have tactile paving.
Junction – Upper Olland Street and Lower Olland Street/ St Mary’s Street (A144)
- There are several crossings at this junction to cross Upper Olland Street, Lower Olland Street and St Mary's Street.
- The crossings have dropped kerbs on both sides, but not all have tactile paving on both sides
- The pathways have a surface of concrete tiles.
- The pathways are narrow at this junction.
- The surface of the road at crossings is tarmac and/or block paving.
- The pathways are uneven in places.
- There are some obstructions along the pavement on both sides such as railings, bollards, cycle racks, bus stops, bins and signboards.
Upper Olland Street to Priory Lane via St Mary’s Street (A144)
- The road is a one way road with traffic travelling in the direction of Upper Olland Street towards Priory Lane and will be difficult to cross except for allocated crossing places.
- The surface of the road at crossings is tarmac or block paving.
- The pathways on both sides of the road in this section are formed of concrete tiles/block paving.
- The pathways on both sides are narrow.
- There are some uneven areas on the pathways throughout this section.
- There are some obstructions along the pavement on both sides such as railings, cycle racks, bus stops, bins and signboards.
- There are some side entrances to cross along the section, most have dropped kerbs, but most don’t have tactile paving.
- There is limited on street parking available midway along the section near Tommy’s Ink Tattoo Studio.
Junction – St Mary’s Street and Priory Lane
- There are several crossings at this junction to cross St Mary's Street and Priory Lane.
- The crossings have dropped kerbs on both sides, but not all have tactile paving on both sides.
- The pathways are formed of concrete tiles.
- The pathways are narrow at this junction.
- The surface of the road at crossings is tarmac or block paving.
- The pathways are narrow and are uneven in places.
- There are some obstructions along the pavement on both sides, such as railings, bollards, cycle racks, bus stops, bins and signboards.
St Mary’s Street to Priory Lane Car Park via Priory Lane (branch off main route)
- The road is a two way road with traffic travelling in both directions.
- The surface of the road at all crossings is tarmac.
- The pathways on both sides of the road in this section are formed of concrete tiles/block paving/tarmac.
- The pathways on both sides of Priory Lane are very narrow, and at the car park end of the road there are no footways at all.
- There are some uneven areas on the pathways throughout this section.
- There are some obstructions along the pavement on both sides, such as railings, cycle racks, bus stops, bins and signboards.
- There are some side entrances to cross along the section, most have dropped kerbs, but most don’t have tactile paving.
- The entrance to Priory Lane Car Park is located on the left and right of the pathways at the end of this section.
Priory Lane to Castle Orchard via St Mary’s Street (A144)
- The road is a one way road with traffic travelling in the direction from Priory Land towards Castle Orchard and will be difficult to cross except for allocated crossing places.
- The surface of the road at crossings is tarmac or block paving.
- The pathways on both sides of the road in this section are formed of concrete tiles/block paving.
- The pathways on both sides are narrow.
- There are some uneven areas on the pathways throughout this section.
- There are some obstructions along the pavement on both sides, such as railings, cycle racks, bus stops, bins and signboards.
- There are some side entrances to cross along the section, most have dropped kerbs, but most don’t have tactile paving.
- There is limited on street parking available along this section of the route.
Junction – St Mary’s Street (A144), Castle Orchard and Cross Street
- There are three crossings at this junction to cross St Mary’s Street, Castle Orchard and Cross Street.
- The crossings have dropped kerbs on both sides, but not all have tactile paving on both sides.
- The pathways are block paving, concrete tiles and tarmac.
- The pathways are narrow at this junction.
- The surface of the road at crossings is tarmac or block paving.
- The pathways are narrow and are uneven in places.
- There are some obstructions along the pavement on both sides, such as railings, bollards, cycle racks, bus stops, bins and signboards.
St Mary’s Street (A144) to Earsham Street via Castle Orchard/Public Footpaths
- This section is public footpaths.
- The pathways are formed of concrete tiles, block paving and tarmac.
- The pathways are narrow in several sections.
- There are slight and steep slopes running from St Mary’s Street into Castle Orchard and throughout this section.
- There are some uneven areas on the pathways throughout this section.
- There are some obstructions along the pathways, such as railings, cycle racks, signboards and bins.
- There are some side entrances to cross along the section, most have dropped kerbs, but most don’t have tactile paving.
Castle Orchard to Broad Street via St Mary’s Street (A144)
- The road is a one way road with traffic travelling in the direction from Castle Orchard towards Broad Street Street along St Mary’s Street, and will be difficult to cross except for allocated crossing places.
- The surface of the road at crossings is tarmac or block paving
- The pathways on both sides of the road in this section are formed of concrete tiles/block paving and tarmac.
- The pathways on both sides are narrow.
- There is a slight downhill slope running along St Mary’s Street towards Broad Street.
- There are some uneven areas on the pathways throughout this section.
- There are some obstructions along the pavement on both sides, such as railings, cycle racks, market stalls, bus stops, bins and signboards.
- There are some side entrances to cross along the section, most have dropped kerbs, but most don’t have tactile paving.
- There is limited on street parking available along this section of the route on some side roads.
Junction – St Mary’s Street/Earsham Street (A144) and Broad Street
- There are several crossings at this junction to cross St Mary Street and Earsham Street and Broad Street.
- The crossings have dropped kerbs on both sides, but not all have tactile paving on both sides.
- The pathways are formed of block paving and/or concrete tiles.
- The pathways are narrow at this junction.
- The surface of the road at crossings is tarmac or block paving.
- The pathways are narrow and are uneven in places.
- There are some obstructions along the pavement on both sides, such as railings, bollards, cycle racks, bus stops, bins and signboards.
St Mary’s Street/Earsham Street (A144) to Bungay Museum via Broad Street
- The road is a one way road with traffic travelling in the direction from Bungay Museum along Broad Street towards St Mary’s Street, and will be difficult to cross except for allocated crossing places.
- The surface of the road at crossings is tarmac or block paving.
- The pathways on both sides of the road in this section are formed of concrete tiles, block paving and tarmac.
- The pathways on both sides are narrow.
- There are some uneven areas on the pathways throughout this section.
- There are some obstructions along the pavement on both sides, such as railings, cycle racks, bus stops, bins and signboards.
- There are some side entrances to cross along the section, most have dropped kerbs, but most don’t have tactile paving.
- There is limited on street parking available along Broad Street.
Broad Street to Chaucer Street (A144) via Earsham Street (A144)
- The road is a two way road and will be difficult to cross except for allocated crossing places.
- The surface of the road at all crossings is tarmac.
- The pathways on both sides of the road in this section are formed of concrete tiles, block paving and tarmac.
- The pathways on both sides are narrow.
- There are some uneven areas on the pathways throughout this section.
- There are some obstructions along the pavement on both sides, such as railings, cycle racks, bus stops, bins and signboards.
- There are some side entrances to cross along the section, most have dropped kerbs, but most don’t have tactile paving.
- There is limited on street parking available along this section of the route.
Junction – Chaucer Street (A144) and Earsham Street (A144)
- There are several crossings at this junction to cross Chaucer Street and Earsham Street.
- The crossings have dropped kerbs on both sides, but not all have tactile paving on both sides.
- The pathways are block paving, concrete tiles, and tarmac.
- The pathways are narrow at this junction.
- The surface of the road at all crossings is tarmac.
- The pathways are narrow and are uneven in places.
- There are some obstructions along the pavement on both sides, such as railings, bollards, cycle racks, bus stops, bins and signboards.
Earsham Street (A144) to Scales Street/Popson Street via Chaucer Street (A144)
- The road is a two way road and will be difficult to cross except for allocated crossing places.
- The surface of the road at all crossings is tarmac.
- The pathways on both sides of the road in this section are formed of concrete tiles, block paving, and tarmac.
- The pathways on both sides are narrow.
- There are some uneven areas on the pathways throughout this section.
- There are some obstructions along the pavement on both sides, such as railings, cycle racks, bus stops, bins and signboards.
- There are some side entrances to cross along the section, most have dropped kerbs, but most don’t have tactile paving.
Chaucer Street (A144) to Public Footpath (Castle Orchard Footpath) via Earsham Street
- The road is a two way road and will be difficult to cross except for allocated crossing places.
- The surface of the road at all crossings is tarmac.
- The pathways on both sides of the road in this section are formed of concrete tiles, block paving, and tarmac.
- The pathways on both sides are narrow.
- There are some uneven areas on the pathways throughout this section.
- There are some obstructions along the pavement on both sides, such as railings, cycle racks, bus stops, bins and signboards.
- There are some side entrances to cross along the section, most have dropped kerbs, but most don’t have tactile paving.
- There is limited on street parking available along this section of the route.
Junction – Earsham Street and Public Footpath (Castle Orchard Footpath)
- There are several crossings at this junction to cross Earsham Street and Castle Orchard footpath.
- The crossings have dropped kerbs on both sides, but not all have tactile paving on both sides.
- The pathways are block paving, concrete tiles and loose chippings.
- The surface of the road at all crossings is tarmac and loose chippings.
- The pathways are narrow and are uneven in places.
- There are some obstructions along the pavement on both sides, such as railings, bollards, cycle racks, bus stops, bins and signboards.
Public Footpath (Castle Orchard Footpath) to Outney Road via Earsham Street (A144)
- The road is a two way road and will be difficult to cross except for at allocated crossing places.
- The surface of the road at all crossings is tarmac.
- The pathways on both sides of the road in this section are formed of concrete tiles, block paving, tarmac and loose chippings.
- The pathways on both sides are narrow.
- There is a steep uphill slope running from Outney Road towards and into Earsham Street.
- There are some uneven areas on the pathways throughout this section.
- There are some obstructions along the pavement on both sides, such as railings, cycle racks, bus stops, bins and signboards.
- There are some side entrances to cross along the section, most have dropped kerbs, but most don’t have tactile paving.
- There is limited on street parking available along this section of the route.
Accessible Toilet (Priory Lane Car Park - Right Hand Transfer)
- This accessible toilet is located within Priory Lane Car Park.
- There is step-free access into the accessible toilet, via ramp/slope.
- This accessible toilet is approximately 11m from the nearest Blue Badge Bay.
- There is pictorial, written text and ‘Not All Disabilities Are Visible’ signage on or near the door.
- There is a manual door which opens outwards and has a poor colour contrast.
- The door has a locking handle (with a RADAR key to access).
- The width of the accessible toilet door opening is 76cm.
- The dimensions of the cubicle are 144cm x 200cm and it does not have a 150cm x 150cm turning space.
- There is a lateral transfer space to the right of the toilet seat.
- The lateral transfer space is 77cm from the side of the toilet pan to the wall.
- There is a lever flush on the non transfer side.
- The following grab rails are available: a horizontal grab rail on the non transfer side, a vertical grab rail on the transfer side, a vertical rail on the right side of the wash basin and a horizontal grab rail on the door.
- There is a dropdown rail on the transfer side.
- The following fixtures can be reached from the toilet seat: the toilet roll holder.
- The following fixtures cannot be reached from the toilet seat: the wash basin, the soap dispenser, towel dispenser and hand dryer.
- The height of the toilet seat above floor level is 46cm.
- The height of the toilet roll holder is 81cm.
- The wash basin tap type is lever.
- The height of the wash basin is 73cm.
- The height of the soap dispenser is 117cm.
- The height of the towel dispenser is 130cm.
- The height of the hand dryer is 93cm.
- There is a pull cord emergency alarm but it is not at a recommended height for seated users (within 10cm from the floor).
- There is a shelf located where it is not reachable.
- The shelf is positioned between 85cm and 105cm and does not have minimum dimensions of 12.5cm x 40cm.
- The cubicle does not have a full length mirror and coat hooks.
- The cubicle also has: a waste bin with lid and a sanitary bin.
- The following have a good colour contrast with their surroundings: the internal door, some grab rails, the dropdown rail and the toilet seat.
- The following have a less clear colour contrast with their surroundings: the floor and some grab rails.
- Lighting levels are low in the cubicle.
Standard Toilet(s) (Priory Lane Car Park)
-
Availability and Location of Standard Toilets
View
- Standard toilet facilities are available.
-
Access to Standard Female Toilet(s)
View
- The female toilet facilities that were surveyed are located on the western side of the toilet block in the Priory Lane Car Park.
- The female toilet(s) is/are approximately 10m (10yd 2ft) from the Car Park Entrance.
- Inside the venue, there is not level access to the female toilet(s).
- Lighting levels in the female toilets are moderate to good.
-
Access to Standard Male Toilet(s)
View
- The male toilet facilities that were surveyed are located on the eastern side of the toilet block in the Priory Lane Car Park.
- The male toilet(s) is/are approximately 3m (3yd 10in) from the Car Park Exit.
- Inside the venue, there is not level access to the male toilet(s).
- Lighting levels in the male toilets are moderate to good.
-
Baby Change Facilities
View
- Baby change facilities are located within the venue.
- Baby change facilities are located within the standard female toilets.
- The height of the baby change table once extended is 84cm (2ft 9in).
- Inside the venue, there is not level access to the baby change facility.
-
Comments
View
- There are 2 medium height steps to access both the male and female toilets.