Access Guide
Car Park 15
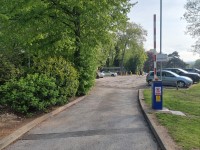
- Car Park 15 is a car park for Blue Badge holders only.
- The car park is located off the main access road through the hospital grounds, opposite the Urgent and Emergency Care Centre, and is accessed off the access route signposted for Greenoaks.
- There is an automatic barrier at the car park entrance which was not in use at the time of the survey.
- The car park is signed, but the signage is not visible from the main access road through the hospital grounds.
- For more information about the car park please see the Car Parking guide.
Hospital Parking (Car Park 15 Accessible Parking)
-
Parking
View
- The hospital does have a dedicated car park.
- The car parking facilities are for Blue Badge holders only.
- The car park is located in front of the main hospital Accident and Emergency building entrance.
- The car park type is open air/surface.
- The car park does not have a height restriction barrier.
- The car park does have a barrier control system.
- The car park surface is tarmac.
- There is a/are Blue Badge parking bay(s) available.
- The Blue Badge bay(s) is/are clearly marked.
- There is/are 10+ designated Blue Badge parking bay(s) within the hospital car park.
- The dimensions of the designated Blue Badge parking bay(s) surveyed are 235cm x 480cm (7ft 9in x 15ft 9in).
- There is a 120cm hatched zone around the Blue Badge parking bay(s).
- Parking spaces for Blue Badge holders do not need to be booked in advance.
-
Drop-off Point
View
- There is not a designated drop-off point.
-
Paying
View
- There are not parking charges for the hospital car park.
-
Access to the Hospital
View
- The route from the car park to the entrance is accessible to a wheelchair user with assistance.
- Assistance may be required because there is/are dropped kerbs.
- The hospital entrance is clearly visible from the car park.
- The nearest designated Blue Badge parking bay is approximately 55m (60yd 5in) from the main hospital entrance.
-
Comments
View
- Access to the main hospital entrance is via dropped kerbs across the entrance to the car park and the main road to the hospital. The route may be difficult due to the payment booth shelter, dropped kerbs, slopes and bollards.
Car Park 15 to Main Car Park Entrance
- From the car park head towards the yellow bollards which run along the far edge of the car park.
- The car park surface is uneven in places (shown in photograph 2).
- In front of the yellow bollards is a pedestrian walkway.
- The pedestrian walkway is clearly marked and has a width of 127cm.
- The surface of the pedestrian walkway and car park is tarmac.
- After joining the pedestrian walkway turn right and proceed towards the hospital building.
- Proceed past the zebra crossing on the left.
- Just beyond the zebra crossing is a dropped kerb with tactile paving (shown in photograph 6).
- Proceed up the dropped kerb and at the fork just ahead bear left.
- Continue to the crossing point for the main car park entrance.
- There is a slight downhill slope leading to the crossing point (shown in photographs 9 and 10).
Crossing Main Car Park Entrance
- There is a designated crossing point over the entrance to the main car park.
- The crossing point has dropped kerbs with tactile paving on both sides.
- There are no markings on the road at the crossing point.
- There is a speed bump just to the right of the crossing point on the road.
- The road is busy with traffic travelling from right to left.
Main Car Park Entrance to Main Crossing Point
- After crossing the main car park entrance proceed along the footpath ahead.
- The footpath is tarmac.
- There is a yellow bollard in the middle of the footpath.
- The bollard reduces the width of the footpath to a minimum of 156cm.
- Beyond the bollard there is a slight downhill gradient (3.9 degrees) (shown in photographs 3 and 4).
- Continue along the footpath and follow it around a slight right hand bend.
- As the footpath bends there is tactile paving at the left hand side for the dropped kerb of the drop off point. There is also a camber from right to left along this section of the footpath, created by the dropped kerb.
- Continue along the footpath towards the end of the tactile paved area.
- Turn right onto a block paved area and continue towards the hospital building and the main crossing point.
- There is a slight downhill slope leading to the main crossing point (shown in photograph 10).
Main Crossing Point
- The main crossing point has dropped kerbs with tactile paving on both sides.
- There are bollards on the footpath side of the tactile paving on both sides.
- The bollards do not contrast visually with the paving, but they do have a visual identification band at the top.
- The minimum width between the bollards on both sides is 155cm.
- The crossing is marked in black and white.
- Some of the white markings are faded.
- The surface of the crossing is tarmac.
- The road is busy with traffic travelling in both directions.
- There is a very slight slope from right to left on the crossing point.
Main Crossing Point to Main Hospital Entrance
- The surface of the pavement leading to the main hospital entrance is block paved.
- There is a slight uphill slope (shown in photograph 2).
- The gradient slightly increases downhill just before the entrance (shown in photograph 3).
- For information about the main entrance please see the Rotherham Hospital guide.
Outside Access (Main Hospital Entrance)
-
Entrance Details
View
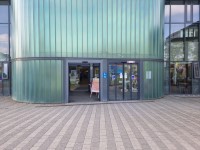
- This information is for the entrance located at the front of the hospital.
- The entrance area/door is clearly signed.
- There is ramped/sloped access at this entrance.
- There is not a canopy or recess which provides weather protection at this entrance.
- There are bollards outside this entrance.
- The minimum width between the bollards/wall is 158cm.
- The bollard(s) has/have a good colour contrast to prevent them being hazardous to visually impaired people.
- The entrance door(s) does not/do not contrast visually with its immediate surroundings.
- There is a dark mat or floor marking at this entrance that might be perceived as a hole.
- There is a bell/buzzer.
- The height of the bell/buzzer is 111cm .
- There is an intercom.
- The height of the intercom is 111cm .
- There is a hand sanitiser.
- The height of the hand sanitiser is 116cm (3ft 10in).
- There is a door release button when exiting.
- The height of the door release button is 119cm (3ft 11in).
- Standard manual wheelchairs are available for people to borrow at this entrance.
- The main door(s) open(s) automatically.
- The door(s) is/are double width.
- The width of the door opening is 158cm.
- There is a small lip on the threshold of the entrance, with a height of 1.5cm or below.
- There is a second set of doors.
- The door(s) open(s) automatically.
- The door(s) is/are double width.
- The width of the door opening is 154cm.
-
Ramp/Slope Details
View
- The ramp/slope is located directly leading from the crossing to the main hospital entrance.
- The ramp/slope gradient is slight.


