Access Guide
Introduction
- This route plan explains the most accessible route to the second floor of the Dorothy Hodgkin Building (Block AY) if the lift shared with the Robert Boyle Building (Block AZ) is out of service. The route comprises a distance of approximately 145 metres with slight slopes located along the route.
- The route requires access to the Edward Jenner Building (Block AX) and use of the Edward Jenner Building lift as well as passing through several sets of manual doors. If the Robert Boyle Building and Dorothy Hodgkin Building shared lift is not in use this route only provides step free access to the second floor of these buildings.
Alternative Access to the Building
- The Dorothy Hodgkin Building (Block AY) can also be accessed via the Edward Jenner Building & Robert Boyle Building.
- For more information on the route to the building via the Edward Jenner Building & Robert Boyle Building please click here".
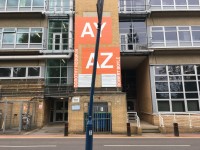
Outside Access (Front Entrance to Block AZ-AY Shared Staircase)
-
Entrance
View
- This information is for the entrance located at the front of the building.
- There is ramped/sloped or stepped access at this entrance.
- A key card is required for access at this entrance.
- The height of the card reader/lock is 105cm (3ft 5in).
- There is a canopy or recess which provides weather protection at this entrance.
- The main door(s) open(s) automatically (towards you).
- The door(s) is/are push pad activated.
- The door(s) is / are double.
- The width of the door opening is 163cm (5ft 4in).
- There is a small lip on the threshold of the entrance, with a height of 2cm or below.
-
Second Set of Doors
View
- There is a second set of doors.
- The door(s) open(s) towards you (pull).
- The door(s) is / are double.
- The door(s) is / are heavy.
- The width of the door opening is 158cm (5ft 2in).
-
Ramp/Slope
View
- There is a ramp/slope at this entrance.
- The ramp/slope is located in front of the entrance and on the right.
- The ramp or slope does bypass the step(s).
- The ramp/slope gradient is slight.
- The ramp is permanent.
- There is a level landing at the top of the ramp.
- The ramp does have handrails.
- The handrails are on both sides.
-
Step(s)
View
- There is a / are step(s) at this entrance.
- The step(s) is / are located in front of the entrance.
- There is / are 2 step(s) to access the entrance.
- There is tactile paving at the top and bottom of the step(s).
- The step(s) is / are not clearly marked.
- The step(s) is / are shallow (2cm - 10cm).
- The steps do have handrails.
- The handrails are on both sides.
Robert Boyle Building Main Entrance to Perimeter Road Crossing
- From the Robert Boyle Building main entrance proceed down the slight ramp towards Perimeter Road.
- The ramp has handrails on both sides and the surface is block paving (as shown in photograph 2).
- After 4m turn left and continue down the slight ramp with handrails on both sides (as shown in photographs 3 and 4).
- Continue for 5m until reaching the bottom of the ramp and turn right to cross Perimeter Road.
- Cross Perimeter Road via the crossing using the dropped kerb and tactile paving (as shown in photographs 6, 7 and 8).
Perimeter Road Crossing to Lakeside Visitors Car Park Junction
- After crossing Perimeter Road turn right and continue along the pavement.
- The pavement is tarmac, uneven in places and has lampposts along the way.
- The pavement has a slight slope leading upwards for approximately 25m before becoming a slight slope leading downwards for approximately 30m.
- Follow the pavement passing a bus stop on the route with an opening of over 75cm (as shown in photograph 5) until reaching the Lakeside visitors car park junction (as shown in photograph 8).
Lakeside Visitor's Car Park Entrance to Edward Jenner Building Main Entrance
- Cross the road leading to the Lakeview visitor's car park using the dropped kerb and tactile paving (as shown in photographs 1, 2 and 3).
- After crossing continue downward along the pavement for approximately 15m before turning right to the zebra crossing to cross Perimeter Road (as shown in photographs 4, 5 and 6).
- The pavement is tarmac with a slight slope leading down towards the crossing.
- There are lampposts along the pavement with a minimum width of 105cm to pass.
- On reaching the crossing use the dropped kerb and tactile paving to cross Perimeter Road (as shown in photographs 7 and 8).
- Upon crossing Perimeter Road turn right and continue on the pavement for 15m before turning left into the Edward Jenner Building main entrance.
- The pavement here is tarmac, uneven in places with a slight slope before becoming a steep slope in front of the Edward Jenner Building (as shown in photographs 9, 10, 11 and 12).
- Enter the Edward Jenner Building via the main entrance (as shown in photographs 13 and 14).
Outside Access (Block AX Main Entrance)
-
Entrance
View
- This information is for the entrance located at the front of the building.
- There is ramped/sloped access at this entrance.
- A key card is required for access at this entrance.
- The height of the card reader/lock is 120cm (3ft 11in).
- There is a canopy or recess which provides weather protection at this entrance.
- The main door(s) open(s) automatically (towards you).
- The door(s) is / are double.
- The width of the door opening is 140cm (4ft 7in).
- There is a small lip on the threshold of the entrance, with a height of 2cm or below.
-
Ramp/Slope
View
- There is a ramp/slope at this entrance.
- The ramp/slope is located in front of the entrance.
- The ramp/slope gradient is slight.
Edward Jenner Building Main Entrance to Edward Jenner Building Lift
- On entering the Edward Jenner Building via the main entrance continue forwards for 5m to the lift which is located to the left of the staircase (as shown in photographs 1 and 2).
- On entering the building there is carpet followed by vinyl flooring (as shown in photograph 4).
Lift (Block AX)
- There is a lift for public use.
- The lift is located ahead as you enter the main entrance.
- The lift is a standard lift.
- The floors which are accessible by this lift are G, 1 and 2.
- Wall mounted information boards are not provided at lift landings.
- The lift is approximately 7m (7yd 1ft) from the Block AX main entrance.
- Staff do not need to be notified for use of the lift.
- The clear door width is 80cm (2ft 7in).
- The dimensions of the lift are 112cm x 130cm (3ft 8in x 4ft 3in).
- There are not separate entry and exit doors in the lift.
- There is a mirror to aid reversing out of the lift.
- The lift does have a visual floor indicator.
- The lift does have an audible announcer.
- The lift does not have a hearing loop system.
- The lift does not have Braille markings.
- The lift does have tactile markings.
- The controls for the lift are within 90cm - 120cm from the floor.
- The lighting level in the lift is bright.
Edward Jenner Building Lift to Second Floor Dorothy Hodgkin Building
- Take the lift to the second floor of the Edward Jenner Building.
- On reaching the second floor of the Edward Jenner Building turn left on exiting the lift.
- The flooring here is vinyl and lighting levels are good (as shown in photographs 1 and 2).
- Follow the corridor to the left for 6m until reaching a single door with one locked extension leaf (as shown in photograph 3).
- The door here is 87cm wide and opens automatically towards you, although the door was held open at the time of survey. There is a key card swipe reader placed at 132cm high.
- Continue straight ahead along the corridor for 16m. You'll pass through a heavy single door with a locked extension leaf, which opens towards you with a width of 88cm (as shown in photograph 5) until the corridor leads to the right.
- After turning right continue straight ahead along the corridor for a further 17m, passing through a heavy double door which opens towards you with a width of 148cm (as shown in photograph 8). Then pass through an automatic double door with one leaf locked with a width of 85cm (as shown in photograph 10).
- The button to operate the door is 110cm high.
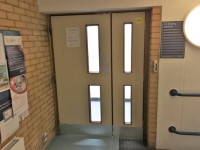
- At the end of the corridor turn left and proceed for 3m before turning right through a manual, heavy single door with a locked extension leaf, which opens away from you with a width of 88cm (as shown in photographs 11 and 12).
- This door is unlocked by using a button placed at 123cm to the left of the door.
- After passing through this door continue across the stairwell to another manual, heavy single door with a locked extension leaf, which opens towards you with a width of 88cm (as shown in photographs 13 and 14).
- This door is unlocked by using a key card swipe reader placed at 130cm high.
- After passing through this door you have now reached the Dorothy Hodgkin Building.
- If the Robert Boyle and Dorothy Hodgkin Buildings shared lift is not in use this route only provides step free second floor access to these buildings.


